CSC 220 - Object-Oriented
Multimedia Programming, Fall 2023, Assignment 5.
Assignment 5 due by 11:59 PM on Thursday December 14 via D2L
Assignment 5.
Our final exam time slot will be a work
session.
Noon class Tuesday, Dec. 12, 2023 11 a.m.-1 p.m. 1:30 class
Thursday, Dec. 14, 2023 11 a.m.-1 p.m.
NOTE ADDED 12/05/2023 after class:
You do NOT have to hit ‘+’ at the same time you hit
a key command like ‘t’.
So in the assignment 5 instructions:
+t<Enter>
means
1. Hold shift and hit the “+” key.
2. Release shift and hit the ‘t’ key.
3. Hit the Enter key when you are ready
for this mutator to take effect.
A student had the misconception that it was necessary to
hold down ‘+’ while hitting ‘t’. It’s not. I will update the
assignment page.
NOTES ADDED IN RED BELOW 12/01/2023
regarding auto-advance versus manual advance on '1' for
Mutators.
Notes apply on to Mutators. Other Transforms remain
unchanged, requires updating Mutators tab with this code.
If you have changed the InvisibleMutator class for the 10
bonus points, be careful not to over-write your work.
Download this
updated Mutators tab & over-write the Mutators tab
code in the
original handout zip file.
12/7/2023: Image file names in file
CSC220Fall2023PaintingAssn5.txt
must be
spelled
exactly
with respect
to upper
versus lower
case. For
example If I
had spelled:
CrowsNestPuddle.jpg
as
CrowsNestPuddle.JPG
it would not
have loaded
and I would
have a blank
image, showing
the
background,
possible
blank.
If some or all
photos are not
showing up,
look for this
bug in file
CSC220Fall2023PaintingAssn5.txt.
1. To get the assignment:
Go to course page and download and unzip zip file of the
starting code.
You have very little coding to do. This is mostly practicing and
the recording your performance of an improvised visual
instrument.
There is some coding.
We will go over a demo of recording and playing back a
performance on November 29. I will post the Zoom video.
2. Practicing
Unzip the handout code into your sketch directory. This sketch
stores multiple PImages into memory at one time. You probably
need to increase Processing available memory in its Preferences
window.
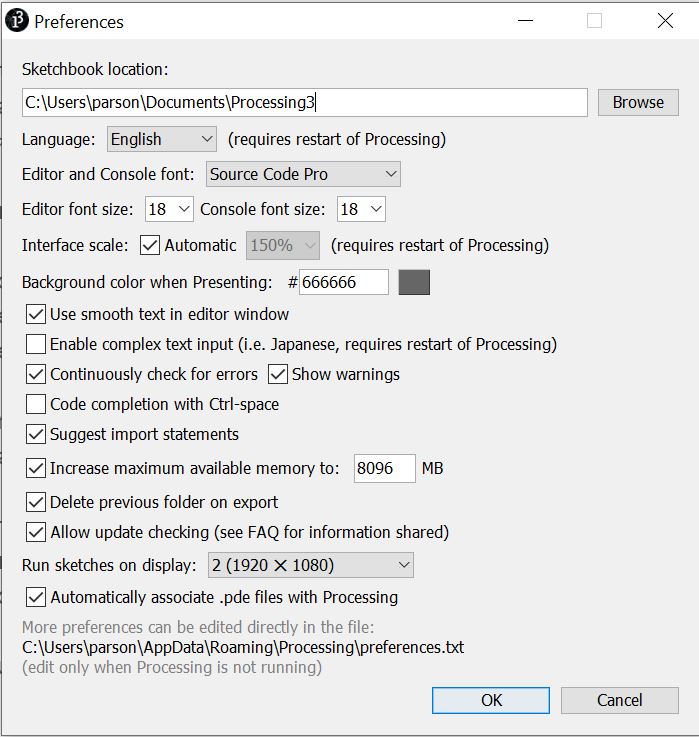
My Processing is up to 8 Gigabytes, although you shouldn't need
to go that high. Check the "Increase maximum available memory"
box and at least double it to 512 MB. Make it bigger on a
computer with more memory. If you get "out of memory" error
messages, try making it bigger.
3. Remove my photos and add yours (20%)
You must remove any image files in my handout and supply your
own, at least one of which must be your portrait.
I am not entirely satisfied with my photo selection and will
change it. For example, PImage.blend() in ADD mode did not wash
out composite images when using earlier geometric shapes, but my
current photos do. To avoid problems with PImage.blend() light
and dark options, try to have consecutive images that do not
share light or dark regions in most of the same areas. Also, I
want to do something different than "nature photos", something
more geometric and new.)
After placing your PImage files into this sketch's directory,
edit handout file CSC220Fall2023PaintingAssn5.txt with the names
of your files, one per line. Make sure to remove my lines. Test
with your photos. You can give the 1 command to the
running sketch to advance through the photos. All commands must
be terminated by hitting the Enter key. Here are the commands
from the code comments.
/* KEYBOARD COMMANDS
All require a trailing \n to trigger interpretation:
+MUTATOR for replacing a MUTATOR from set below to be
the sole mutator
of the worker-thread mutator queue. See
MUTATOR commands below.
- for removing any MUTATORs from the worker-thread
queue.
rANGLE rotate the previous canvas snapshot ANGLE
degrees as the background
sSCALE scale the previous canvas snapshot SCALE amount
as the background
RANGLE rotate the foregound image a fixed ANGLE in
degrees
SSCALE scale the forground image a fixed SCALE
Xpixels Move horizontally pixels per draw(), positive
or negative
Ypixels Move vertically pixels per draw(), positive or
negative.
f toggle foreground image painting
b toggle background image painting
F toggle drawForeground() foreground call
B toggle drawBackground() background call
c toggle clipping circle
C toggle clipping square
p toggles painting on/off, i.e., no background command
in draw() when on
e toggles echo on/off, i.e., take snapshot at end of
draw() when on, display at start of draw()
x toggles reflect on/off anything painted around the x
axis (reflect via scale(1,-1)).
y toggles reflect on/off anything painted around the y
axis (reflect via scale(-1,1)).
z toggles reflect x and y on/off, on reflects anything
painted around the x and y axes
0 resets translations, rotates, scales to their default
values, eliminates mutation(s) in effect
- eliminates mutation(s) in effect
1 or 2 or ... Decimal String advances the imageQueue
reading this many positions % imageLimit
QQQ quits the program after flushing any pending key
capture recording output
MUTATORS:
IGNORE INT and FLOAT in these commands. To be implemented
later.
For now they use default initialization values set in their
constructors.
+b
blur(2) filter
Type 1 then Enter
when image is totally blurred.
+f
fade foreground image
Auto-advance works, no typing needed.
+e
etch with a probability of 0.15
Type 1 then Enter when image is mostly
etched away.
+n
nest with a nesting ratio 0f 0.75 Type 1 then enter to go on to the next
image.
+m
mask image 0 with image 1
Rather poor
effect, requires type 1 then Enter.
+s
blend SCREEN image 0 with image 1 Rather poor effect, requires type 1 then
Enter.
+t
threshold etcher
Auto-advance works, no typing needed.
+c
etch in and out from an outer circle Auto-advance works, no typing needed.
+q
etch in and out from an outer square Auto-advance works, no typing needed.
+s1
Posterize Mutator
Auto-advance works, no typing needed.
+s2
Erode Mutator
Auto-advance
works, no typing needed.
+s3
Dilate Mutator
Auto-advance works,
no typing needed.
+s4
Invisible Mutator hides foreground PImage
Optional extra credit re-write.
-
eliminates mutation(s) in effect
*/
Test to make sure your PImages display correctly by repeatedly
hitting the 1 key followed by Enter.
4. Coding (20%)
Rewrite the drawBackground() and drawForeground()
functions to display more interesting graphics that work well
with the e (echo) and s (scale echoed image)
commands. You can test by running b to toggle the
background photo not to display, then f to toggle the
foreground PImage not to display, then both B and F
to enable drawBackground() and drawForegound() respectively.
Fill in the comment block at the top of the main tab, making
sure to answer this question:
/* Permission to share in Rohrbach Library and YouTube (YES or
NO):
You are under no obligation to include your work in the video. I
exhibit video artwork, but some pieces are just learning
experiences. This is your decision & does not affect your
grade.
Make sure to change this line in the code to use your name.
final String CREDIT = "Dr. Dale Parson, CSC220, Fall 2023";
Do not make other changes to functions. That may break the next
step.
5. I will grant ten bonus points for anyone who re-implements
the call() function of class InvisibleMutator in the Mutators
tab to do something totally new to the sketch.
Right now it just makes the foreground image transparent,
duplicating command f functionality. There are examples
of using PImage.filter() and PImage.blend() in other mutators in
that tab. You could do something new with one of those or come
up with something completely new. You can test it by running +s4
followed by Enter. Do not change the name of the class. Add a
comment at the top of the main tab letting me know if you go for
the bonus points.
6. Recording and playing back your performance (60%)
After practicing the sketch performance, change this line of
code:
final String KeyRecordingFile = null; // "Assn5KeyRecording.txt"
; // Make null to skip recording/playback
to this:
final String KeyRecordingFile = "Assn5KeyRecording.txt" ; //
Make null to skip recording/playback
Running the sketch now will record all keystrokes into that
file. A subsequent run without changing the name of the file or
removing the file results in this error message:
ERROR, PLEASE REMOVE OR RENAME
KEYPRESSED RECORDING FILE Assn5KeyRecording.txt BEFORE
RECORDING.
There are a bunch of cryptic Processing error messages following
this line, all in red. Scroll up to see it.
Terminate a sketch being recorded by typing the command QQQ (for
quit) followed by Enter. This flushes keystroke output. You can
just remove the recording file, or rename it to keep it, if you
want to make multiple recordings. Make sure variable
KeyRecordingFile is set to the name of the file you want
me to use to play back your favorite performance.
Once you are comfortable with the keyboard commands, change this
line:
boolean IS_PRINTING_COMMAND = true ;
to this:
boolean IS_PRINTING_COMMAND = false;
To play back after recording a keystroke file, change this line
of code:
boolean isRecording = true ;
to this:
boolean isRecording = false ;
7. Turning it in
Turn in all files in the sketch directory including the code TAB
.pde files, the image files, CSC220Fall2023PaintingAssn5.txt
with the names of your files, and your keystroke recording file
with variable KeyRecordingFile set top its name and isRecording
set to false so I can play back your performance. I will merge
30 to 60 seconds of your recording into the final video,
depending on RaspberryPi memory constraints. Let me know if you
have a favorite part to include by putting that into the
comments at the top of the sketch.
The final exam periods
listed at the top will be work sessions with Q&A, in
person or on Zoom as usual. You are welcome to attend both.
There is the usual 10% per day late charge and I cannot accept
anything turned in after Saturday night, since I need to
complete most grading on Sunday.